20 Sep 2023 Biosecurity Guide for African Swine Fever (ASFv)
The Biosecurity Guide provides comprehensive information on various aspects related to African Swine Fever (ASF) and the effective interventions against it.
Guide contents:
- The current situation regarding ASF
- 7 critical steps for thorough cleaning and disinfection.
- Practical tips and tricks for the application of disinfectants contributing to enhanced biosecurity measures in the livestock industry
- Step-by-step guide on how to disinfect livestock trailers using Intervention® concentrate
DOWNLOAD THE GUIDE>>
African Swine Fever – the Situation
African Swine Fever, caused by the ASFv virus, is a highly contagious disease that has severely impacted the global swine industry, leading to symptoms like appetite loss, bleeding, vomiting, and respiratory distress, often resulting in death for infected pigs. Initially identified in Africa and transmitted naturally between soft ticks and wild warthogs, the virus has spread to Europe in the 1950s and has seen a significant rise in cases since 2016, with Asia being particularly affected.
Current Treatment – Prevention
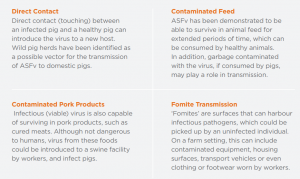
As there is no treatment currently available for pigs infected with ASFv, prevention is the only protective measure in place. If a facility were to report a case of the disease, the only option would involve depopulating all swine herds exposed to the virus. In addition, a reported case would trigger severe limitations on the movement and export of pigs, creating a ripple effect throughout the industry with lasting economic consequences. For these reasons, good biosecurity is vital to prevent the entry and spread of ASFv. Preventing the spread of ASFv requires an understanding of how the virus is transmitted to commercial swine herds.
Key modes of transmission

Biosecurity for ASFv
Most of these modes of viral transmission can be prevented to a great extent by good biosecurity practices. Biosecurity encompasses many different types of strategies, but in the context of ASFv includes ensuring that feeds are sourced from reputable production facilities, preventing the entry of sick animals into a facility, and ensuring that surfaces are thoroughly cleaned and disinfected between use. In addition, ensuring that farm staff or visitors are not bringing any contaminated materials, whether through food, clothing, or equipment, is essential. This means thoroughly cleaning and disinfecting contaminated items (including clothing and footwear) before they are introduced into a swine facility, and making use of a Danish entry system for visitors. When implemented correctly, a rigorous biosecurity protocol acts as the first line of defence in preventing the entry and spread of this virus throughout swine operations.
Seven Steps of Cleaning and Disinfection
Step 1: Dry Cleaning and Removal of Gross Soils
The first step is to remove any major dirt and debris to prepare for cleaning and disinfection. This means removing any items from the area that can be removed, and using a scraper, shovel, or brush to remove feces, dirt, feedstuffs, and bedding. This step must occur in order for cleaning and disinfection to be successful.
Step 2: Soaking of Surfaces
This step involves soaking the surface with water and a detergent. This will help suspend soil residues in the wash solution, and dislodge tough, hydrophobic soils such as feces and biological fluids. Ideally, the detergent should be applied from the bottom to the top of the surface, to avoid runoff and to be able to clearly see where the detergent has been applied. Some disinfectants, such as Intervention®, contain detergents built into their formulation. In this case, the disinfectant may be used at a higher dilution to perform the pre-soak step.
Step 3 : High Pressure Cleaning
Once the detergent has been allowed to soak on the surface and dislodge soil residues, the next step is to remove these soils by rinsing with water at a high pressure (750 – 1800 psi).
This should ideally be done with hot water to aid the cleaning process, and should be applied in the opposite direction as the detergent (from top to bottom).
Step 4: Drying Prior to Disinfection
Once the surface has been rinsed, it should ideally be allowed to dry prior to the disinfection step. There are two reasons for this:
- Water left behind on the surface can dilute the disinfectant, resulting in a weaker solution than what may be required to successfully kill pathogens.
- If there is any detergent left after the rinse step, this could potentially interact with the disinfectant and interfere with its efficacy.
If a full drying step is not possible, this can be addressed by selecting a detergent with some biocidal activity, or in using a disinfectant that is highly effective against a broad spectrum of organisms in a rapid contact time, as this product would unlikely be inactivated by low levels of residual water on a surface. If the same product is used for the pre-soak and disinfection step, this can also prevent any interactions between different chemicals.
Step 5: Disinfection
This is the process of applying an EPA registered disinfectant to kill pathogens of concern. This is done by evenly applying the chemical to the surface, and letting the solution remain wet for the required contact time, which is specified on the product label.
There are a few factors established by the CDC to guide your selection of a disinfectant:
- The ideal disinfectant is non-toxic and nonirritating to people and animals
- Is also non-corrosive to equipment.
- In addition, it is ideally environmentally friendly, as runoff will ultimately end up in the environment or in wastewater treatment systems that depend on microflora.
- However, the disinfectant should have strong efficacy against a wide range of pathogens, and do so in a realistic contact time. It should also be able to be applied as a foam, to improve surface coverage.
Step 6: Drying Prior to Restocking
The purpose of this step is to protect the animals from exposure to harmful chemical residue.
If a non-toxic and non-irritating disinfectant is used, as recommended in the previous step, then this drying step is not required.
Step 7: Surface Sampling
Surface sampling can be performed to validate the efficacy of the cleaning and disinfection process, by detecting the presence of dirt or pathogens remaining in the surface. There are several methods available:
- ATP bioluminescence measures the efficiency of cleanliness by assessing the bioburden (organic matter) on a surface.
- Agar contact plates or swab sampling provide a more in-depth analysis of the types of organisms, but are more time consuming.
- PCR testing provides a snapshot of the amount of viral material on a surface, but does not distinguish between infective and “dead” inactivated virus.


